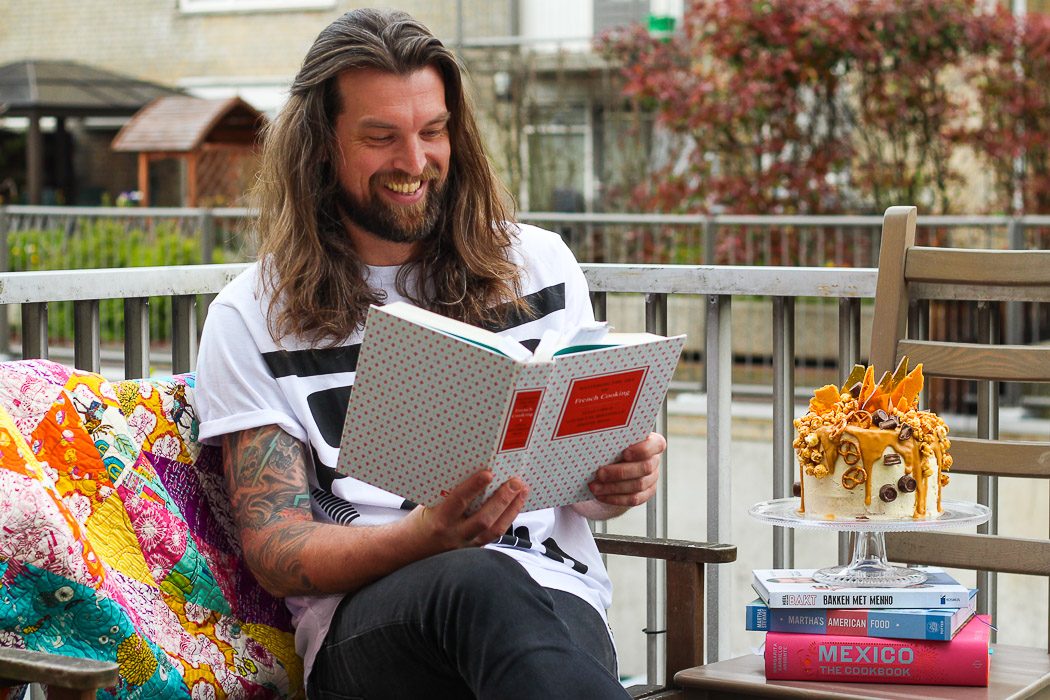
I was biking through a cute family neighbourhood a few weeks ago, on my way to a long-awaited Dishtales People shoot. We’ve been trying to set a date, but somewhere between countless events, writing cookbooks and continuing his daytime job it proved to be more difficult than we thought. Life has become more (positively) turbulent after a national display of his remarkable talent for baking gorgeous creations. Just a few years ago he won the second season of the Dutch television program Heel Holland Bakt, a Masterchef type of competition for baking talent. Hence, for many Dutch readers it’s rather unnecessary to introduce him. I’m super excited though to share the utterly fabulous, even somewhat experimental (!) baking adventure of that day with you all. So in Dishtales style, I invite you to continue scrolling down and discover the true definition of #foodporn and allow me to introduce you to the man behind it all: Meet Menno!
Upon entering his apartment, I was expecting a big, extravagant kitchen with a brutal collection of everything Kitchen Aid and an oven the size of a bedroom. My expectations were not met, as Menno de Koning‘s (really) tiny kitchen merely includes some basic equipment and (of course) a Kitchen Aid mixer, which actually was one of the prices for winning the show! As I entered his playground and started photographing him (while he prepped his phenomenal recipe) I could strongly sense the extend of his passion for what he does together with a healthy dose of self-confidence. The latter came in handy as he decided to present a (somewhat) experimental recipe. Oh and if you loved baking recipes from his first cookbook, brace yourself as his second cookbook is coming up! That said, I’d like to thank this amazing man for the FUN photoshoot, for sharing his passion with such calm elegance and for being such a humble, generous guy as he presented a preview recipe (YAAAS!) from his new book. I’ll leave you with these mouth-watering pictures and Menno’s step-by-step recipe to build up your very own Salted Caramel Vanilla Drip Cake.
ENJOY!

BUY:
- For Vanilla Cakes
- 360 gr flour
- 400 gr sugar
- 4 tsp baking powder
- ½ tsp salt
- 120 gr (soft) butter
- 360 ml whole milk
- 3 eggs
- 2 tsp vanilla extract or 2 vanille pods
- For Vanilla Buttercream
- 500 gr icing sugar (powdered sugar)
- 160 gr (soft) butter
- 50 ml whole milk
- 1 tsp vanilla extract or 1 vanille pod
- For Salted Caramel
- 200 gr sugar
- 90 gr salted butter
- 120 ml cream
- 1 tsp sea salt
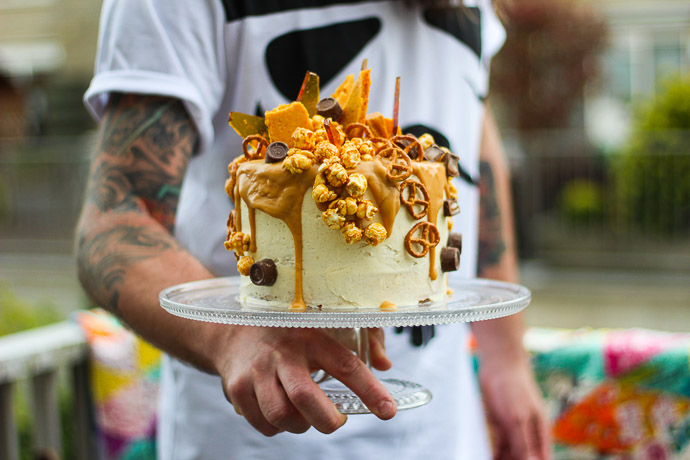
- As for decorations use Rolo's, caramel popcorn, fudge and other (caramel) candies. Let your imagination run free here!
DO:
- Baking the Cakes: Pre-heat oven to 175 degrees (Celcius).
- Grease 3 baking tins of around 18/20 cm with butter.
- In a large mixing bowl add the flour, sugar, baking powder, salt and soft butter. Mix all ingredients well (e.g. with a handmixer) on low speed.
- Take the milk and whisk in the egg and vanilla. Add this to the flour mixture and mix well. If needed, remove and mix in excess batter that is pushed to the sides in your mixing bowl. Continue mixing on medium speed until smooth.
- Spread the batter into the baking tins and bake the cakes for 30-35 minutes in your oven.
- Take the baking tins out of the oven and let the cakes cooldown for 15 minutes before removing from the tins.
- Prepping the Butter Cream: Mix icing sugar and soft butter with a hand or standing mixer until well mixed. Pour in the milk and vanilla. Continue beating the mixture for about 5 minutes until light and fluffy.
- Salted Caramel: In a small sauce pan, heat the sugar over medium to high heat, while stirring with a wooden spatula (Yes, you can stir this!).
- Some sugar lumps can appear but it will gradually melt and turn into thick, brown caramel. Be careful NOT to burn the caramel by keeping your heat at medium high (instead of too high).
- When the sugar is melted completely, add the butter (in small cubes). Be careful as the sugar will start bubbling at this point. Continue stirring in the butter until completely absorbed.
- Slowly add the cream to your caramel mixture while stirring.
- Let it all cook briefly (1 minuut), remove from the stove and add the sea salt.
- Allow the caramel to cool completely before using it.
- Layering & Decorating: Spread some of the buttercream between layers of cake to build up.
- Start with spreading the buttercream around and on top of the cake as a primary layer. Set aside to cool (e.g. in your fridge) and stiffen a bit. Continue with your second and final layer after, to finish the buttercream coating.
- After letting the cake become a bit firmer (e.g. by setting aside in a cool place for a few minutes) you can start with gently pouring the salted caramel sauce all over the top and allow it to drip down the sides slowly.
- Now it's finally time to start decorating! *
Oh and FYI:
* For this drip cake Menno used caramel based candies (e.g. Rolo's, caramel popcorn) and even some salted pretzels to decorate. However, there's no limitation in how to decorate this cake. Let your imagination run free and go creative on your customised drip cake!


That looks so delicious